
Daughter asked if there was a way to set up her new inkjet printer to print once a week to prevent the printer heads from drying out, much like her last printer had done. She really doesn’t want to buy a printer again just because she didn’t use it enough. I said “Absolutely. I can just set up a cronjob to print to it from my Linux computer and schedule that to print once a week. Problem solved”.
Now therein lies the underlying problem, I have no idea how to set up a cronjob in Linux even though I’ve been using Linux to some degree since 1998. This lead to many google searches and reading a ton of articles and posts, NONE of which actually laid out how to do it step by step. So, I’m writing this article to do just that, lay it out step by step, including the spots that I stumbled along with and finally got it with trial and error.
Step 1: Start a terminal and get a list of your printers with lpstat -p
buzz@DalePC:~$ lpstat -p
printer Canon_TR8600_series is idle.  enabled since Sat 08 Feb 2025 08:30:33 AM EST
printer HP_Color_LaserJet_MFP_M283fdw_A3499E is idle.  enabled since Fri 07 Feb 2025 08:04:24 PM EST
printer HP_LaserJet_M207-M212 is idle.  enabled since Thu 30 Jan 2025 05:44:46 PM EST
printer HP_LaserJet_M209dw_F64C50 is idle.  enabled since Fri 07 Feb 2025 08:04:23 PM EST
So in this example I want to use the HP_LaserJet_M207-M212 printer. This naming convention is important as you will use it later on.
The next step is to find your cups testprint page. Many of the articles I read said to use testprint.ps, but on my Tumbleweed it is only testprint. My test print is located in /usr/share/cups/data/
In the following example I highlighted the file I’m looking for in purple.
uzz@DalePC:~$ dir /usr/share/cups/data/
total 640
-rw-r--r-- 1 root root    979 Feb  1 00:18 classified.pdf
-rw-r--r-- 1 root root    981 Feb  1 00:18 confidential.pdf
-rw-r--r-- 1 root root    845 Feb  1 00:18 default.pdf
-rw-r--r-- 1 root root  39852 Feb  1 00:18 default-testpage.pdf
-rw-r--r-- 1 root root  13661 Feb  1 00:18 form_english_in.odt
-rw-r--r-- 1 root root 276070 Feb  1 00:18 form_english.pdf
-rw-r--r-- 1 root root  13866 Feb  1 00:18 form_russian_in.odt
-rw-r--r-- 1 root root 270261 Feb  1 00:18 form_russian.pdf
-rw-r--r-- 1 root root    975 Feb  1 00:18 secret.pdf
-rw-r--r-- 1 root root    979 Feb  1 00:18 standard.pdf
-rw-r--r-- 1 root root    234 Feb  1 00:18 testprint
-rw-r--r-- 1 root root    979 Feb  1 00:18 topsecret.pdf
-rw-r--r-- 1 root root    981 Feb  1 00:18 unclassified.pdf
So that’s all we need to print that test file to the selected printer by command line. And we can try it straight in the terminal we’re in with…. (if yours is testpint.ps, be sure to add the .ps to the end)
buzz@DalePC:~$ lpr -P HP_LaserJet_M207-M212 /usr/share/cups/data/testprint
And there you have it. My successful testpage printed on a specific printer by command line.
If that worked as it should have, now it’s time to make a bash script. Create a file with any name you want ending it with .sh. You can also create this file anywhere you want to in your file system. I recommend creating a folder in your home folder and naming it something to remember by, like ‘scripts’. One last note, I also recommend naming a one word name with no spaces. Command line becomes a bit more tricky with spaces in folders and file names.

Now create a file that will become your bash script file, the end of that should have .sh. Again, I recommend not having any spaces.

Edit this file in any editor you like, mine will be kate. The first line in the file is going to have #! /bin/bash. On the second line add the same command line code that we used before that successfully printed the test page to the printer. You can copy and paste from the terminal in most Linux systems. It should look like this…
#! /bin/bash
lpr -P HP_LaserJet_M207-M212 /usr/share/cups/data/testprint
Save the file and close your editor. Now make the file executable. In plasma you can right click the file, select properties and check the executable box.
Or you can make it executable in a terminal with ‘chmod +x filename.sh’

Now test your bash file by running it. You can run it in a terminal with (make sure you’re in that files directory) ./filename.sh
./printscript.shI now have another printer test page on the printer.
Now you have a choice to make. There’s two ways to set this file to run weekly in cron. Apparently there is a cron.daily, cron.hourly, cron.weekly, and cron.monthly folder you can place that bash script into and it will automatically happen weekly (putting in the cron.weekly folder). Probably the easier option but you don’t have control over when that weekly trigger takes place. The other option is to set up a crontab entry. This way you can control exactly when it happens.

To move the file to the cron.weekly by command line….
sudo mv printscript.sh /etc/cron.weekly/Now lets set up a crontab entry. We do this by leaving the bash file in our home/username/scripts/ folder. There’s no need to move it and it’s easy to remember. run ‘crontab -e’ to enter the crontab editor
crontab -e
You can see I already have a printer entry for the inkjet.
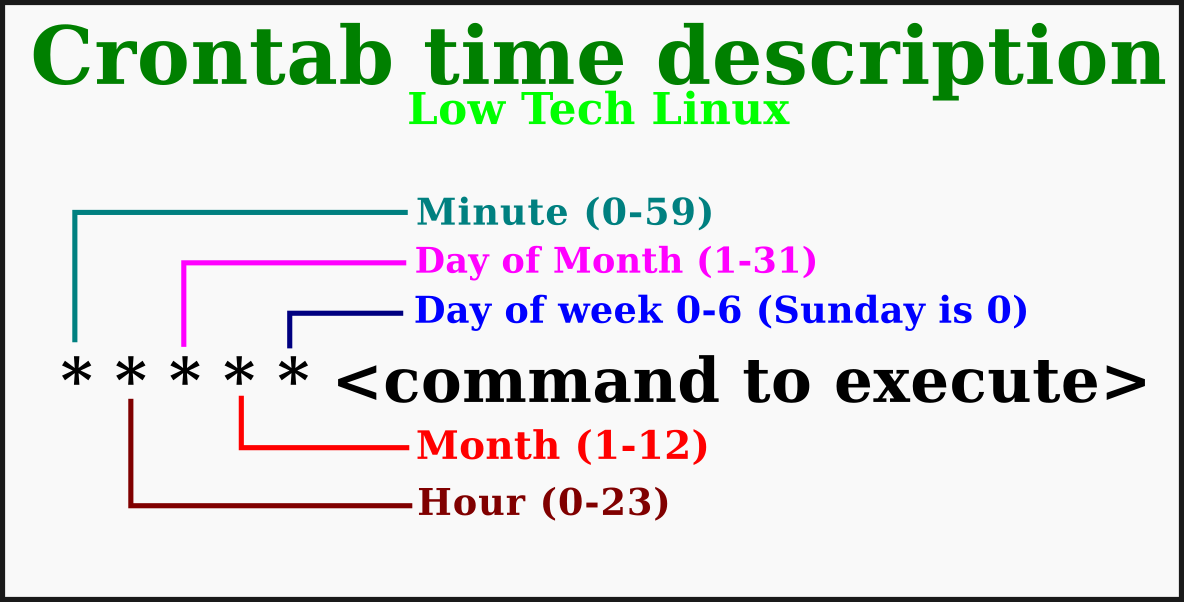
To get a cursor for editing, press ‘i’. This is for insert. Anything after # is ignored and used for comments or descriptions. The following image is how to interpret the time controls of crontab.

to explain the above image, if you want your file to print at 6:00 am every day your crontab entry should look like…
00 6 * * * /home/username/scripts/printscript.sh > /dev/nullthat tells crontab to print at the 0 minute of the 6th hour of any day of month, any month, any day of the week.
to tell crontab to print at 6:00 am every monday it would look like….
the > /dev/null tells it to error or print out silently into nothingness. Crontab is designed to email outputs, this sends all outputs to nowhere
00 6 * * 1 /home/username/scripts/printscript.sh > /dev/null
To exit edit mode, press escape
To save and exit the editor (vim), press : (shift and ;). Makes perfect sense to me, right? Then type ‘w’ and ‘q’ and press enter. The w stands for write (as in write to disc) and the q is for quit.
That’s it. You now have a cronjob set up for printing to a printer at regular intervals.
-Dale
